Do you own or manage a WordPress site? Does it get complex with frequent traffic spikes? Well, you are at the right place. This time, I will show you the ideal architecture for creating scalable WordPress hosting in AWS.
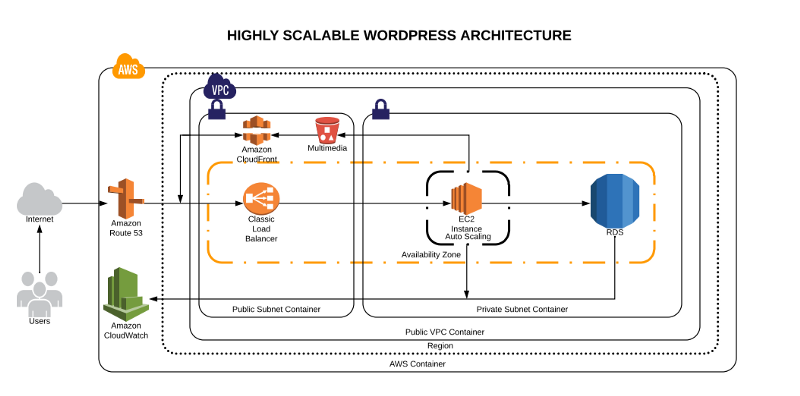
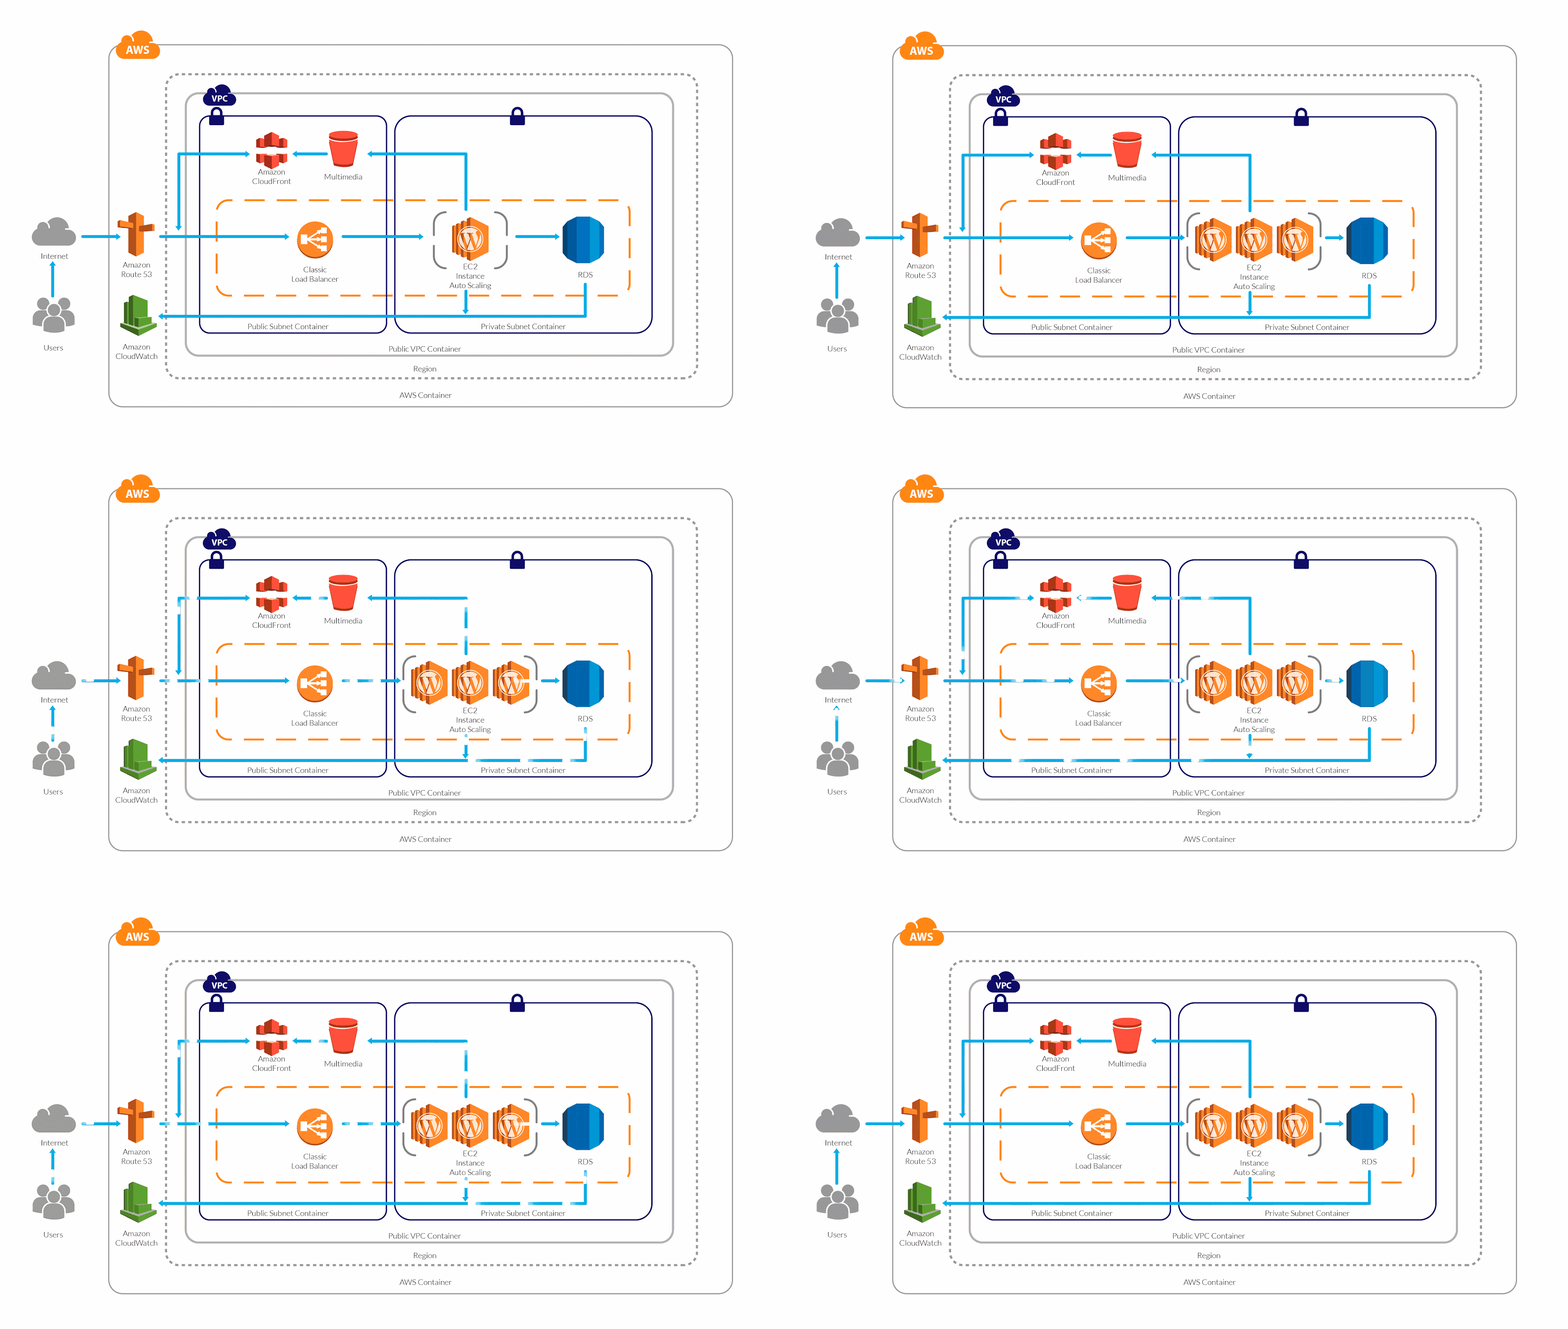
This blog is intended to show a distributed architecture in AWS for WordPress CMS Websites. You will be able to identify the different layers of services needed to run a High Traffic WordPress.
- Understanding High Availability and Scalability
- 1. Set up Route53 DNS Service
- 2. Create all your AWS Resources in a VPC
- 3. Secure your most valuable resources in a Private Subnet
- 4. Leave your public resources in the AWS Public Subnet
- 5. Store your WordPress content on AWS S3
- 6. Enhance your WordPress Speed with AWS CloudFront CDN
- 7. Distribute your WordPress Visitors on your environment with AWS Load Balancer
- 8. Setup your WordPress instance in AWS EC2
- 9. Scale your WordPress with AWS Autoscaling
- 10. AWS RDS & Multi A-Z
- 11. Monitor your WordPress Environment with AWS Cloudwatch
- Scaling and Implementation Considerations
- Conclusion
Understanding High Availability and Scalability
High Availability
This means that a system can operate without any service disruption or interruption for a long time and for a system with redundant components. In our case, the redundant Infrastructure will be our High Availability — Thanks, AWS, for making this easier!
Distributed Services — Loose Coupling
The art of distributing different components of a system in the same network. We will do this to leverage any resource’s load and have dedicated hosts for a service.
Scalability
A system can monitor user demand and automatically increase or decrease resources. This scalability will be provided by the following AWS Resources: AWS ELB, AWS EC2, AWS S3, AWS RDS.
One essential part of innovation is staying current and implementing the best technology available.
“Technology is like a fish. The longer it stays on the shelf, the less desirable it becomes.”
Andrew Heller
If you are planning to follow this blog, it is because you are looking to migrate to Amazon Web Services or you already have an environment or some resources allocated there. If you are already on AWS, we have also compiled a very concise checklist, which you can obtain here.
“Everything must be made as simple as possible. But not simpler.”
Albert Einstein
1. Set up Route53 DNS Service
This service will help us manage all the upcoming requests (traffic) that our domain will have. AWS Route53 will also be the DNS Manager, so here we will point our domain registrar to be the manager. Once it has been migrated here, we can add the A records, Cnames, or TXT records and many more.
2. Create all your AWS Resources in a VPC
The AWS VPC is a service that allows us to have a private network in which we will allocate our cloud computing resources, meaning nobody has access to it, only ourselves.
3. Secure your most valuable resources in a Private Subnet
The private subnet is the subnet to which we are going to deploy the resources we don’t want outsiders to have access. In this case, our database will be only accessible by the application.
4. Leave your public resources in the AWS Public Subnet
The public subnet is the subnet in which we will deploy the resources we want to make public — like the server for our Website.
5. Store your WordPress content on AWS S3
Amazon Simple Storage Service will be our content storage solution. Here our WordPress installation(s) will have the content available whenever it scales up or off.
6. Enhance your WordPress Speed with AWS CloudFront CDN
CloudFront, combined with S3, will help us to spread the content faster to the end users. This way our WordPress multimedia content will be spread all over AWS CDN Network (Edge Locations) which will be used from our application to reduce the latency. Users will be served by the closest edge location available. So faster content = Faster Site.
7. Distribute your WordPress Visitors on your environment with AWS Load Balancer
Here is the tricky part. The AWS ELB will allow us to distribute the traffic load between our available or in-use instances depending on how the auto scaling is set.
8. Setup your WordPress instance in AWS EC2
Instances, also called “VMs,” are the services on AWS for acquiring computing power. AWS EC2 will allow us to host our WordPress site and the needed files.
9. Scale your WordPress with AWS Autoscaling
Here’s the magic! This will be the solution for our highly available and scalable WordPress site. AWS Autoscaling will take care of always having a minimum quantity of instances available for the public and in case something goes wrong, it will replace the instance with a healthy one, this way our site will always be available.
Autoscaling will also benefit our WordPress by creating instances based on traffic demand, helping us save costs when traffic is low.
10. AWS RDS & Multi A-Z
RDS will be the service in which we will host our WordPress Database. The service is completely free and fully managed by AWS. So that gives AWS a plus since we won’t need to worry about database management anymore. Also, a helpful feature is that RDS instances can have replication between them, that adds even more scalability.
Another feature that will provide us with high availability is enabling the Multi-Availability Zone (Multi A-Z) feature. Keep an eye on this since the price will is double for the RDS.
11. Monitor your WordPress Environment with AWS Cloudwatch
AWS Cloudwatch will be our trusted supervisor. Cloudwatch will be in charge of monitoring all the resources in our AWS account. It will keep an eye on the metrics that are predefined or defaulted by AWS resources, such as CPU usage, memory usage, disk IO, and networking.
ALSO READ: Top 10 AWS services you should know about
Did I forget about EFS?
In my experience, EFS has not been very helpful when it comes to sharing WordPress files only. However, you can try using EFS; that way, the content will be replicated much faster and easier.
If you want to learn more about the technologies and the approach that should be taken to create this kind of environment, take a look at this post.

Scaling and Implementation Considerations
One of the core components of a scalable, high-availability architecture is how traffic is managed and scaled. Let’s walk through the key elements of traffic flow, caching, CDN, and performance optimization to ensure your WordPress site can handle millions of visitors without compromising on speed or availability.
Traffic Flow
Here is how your visitors get to your site : once they hit your domain on their browser, their request will pass to the Internet, which will route it to your DNS manager. The DNS manager(Route53) will solve the request to the specified server, which will then serve the application.
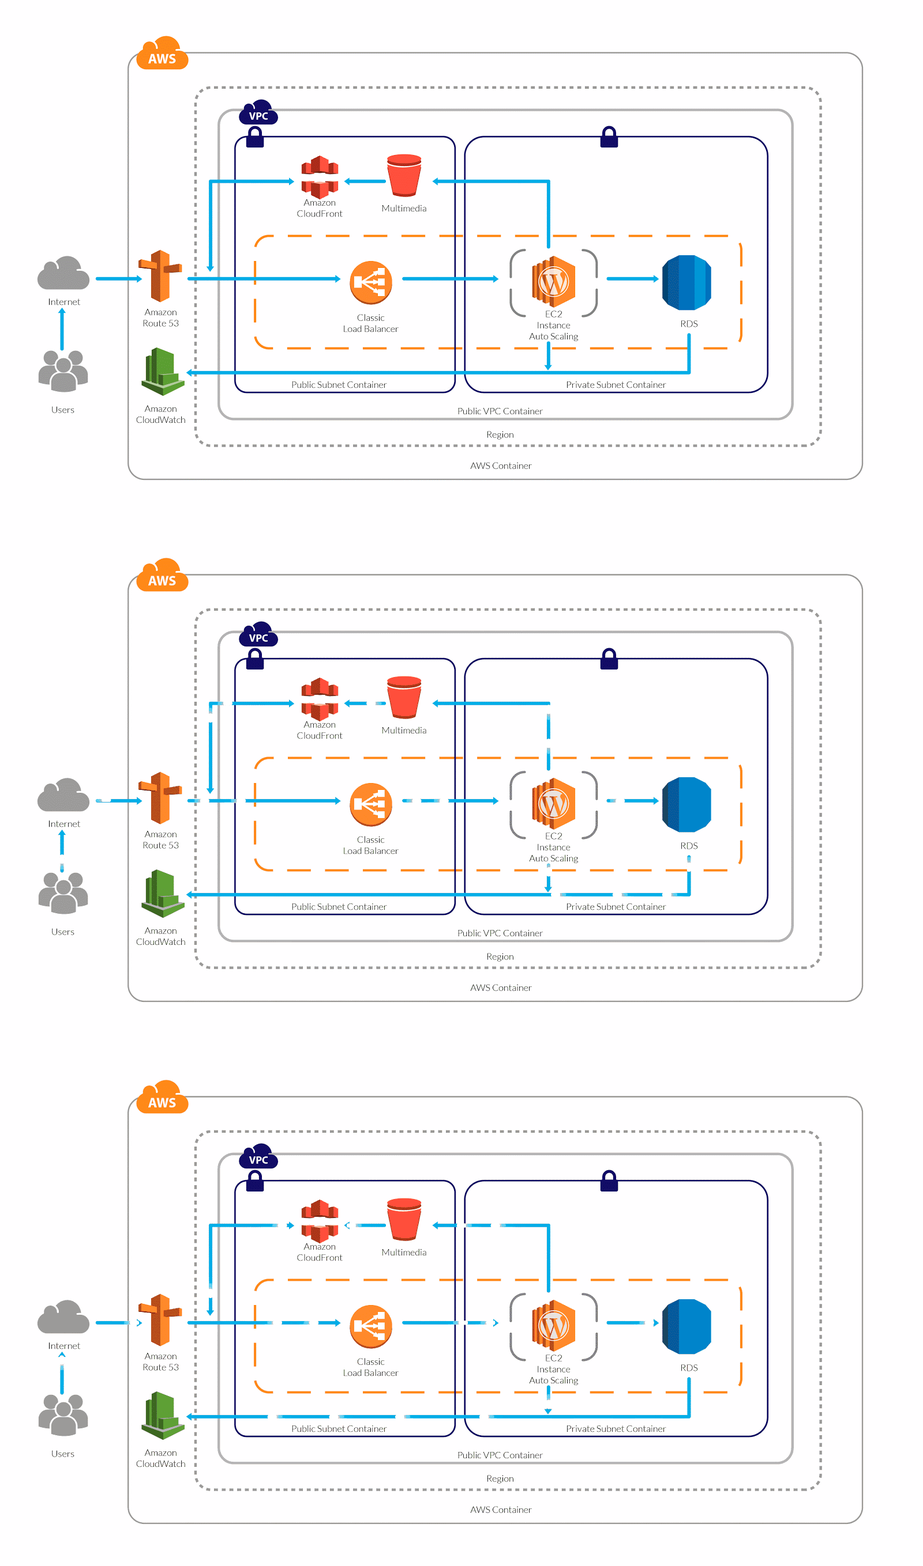
What will happen when your traffic increases? Well, here is an example:
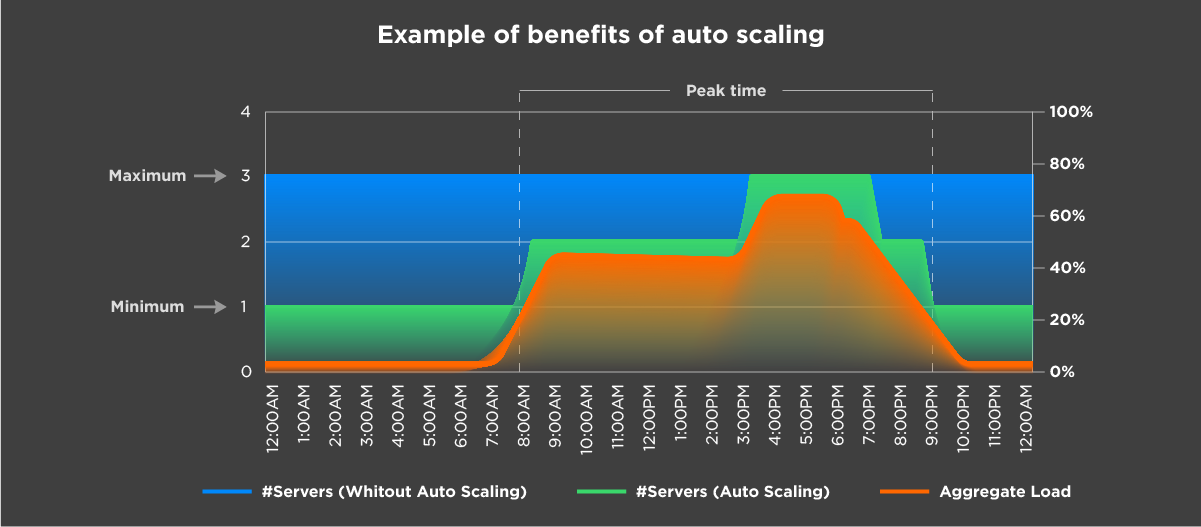
Let’s say that you have set the autoscaling, a Minimum number of instances, which is 1, and a Maximum number of instances, which in this case is 3. Based on different metrics, your environment will be able to scale out depending on the load it receives.
In the image above, we can see that depending on the Aggregate Load, the environment continues to satisfy the demand by creating more instances as it grows and the same happens the other way.
What does this mean? It means a lot when calculating your cloud environment’s TCO. It also means that you won’t run out of memory or other resources; instead, you will have a more available system.
You might be wondering what is going to happen to my AWS Resources. Well, this is it. Simple, more demand/traffic, more servers to meet it.
Server Caching / WordPress Caching
Server-side caching or WordPress-side caching with a plugin or embedded in a host. Whenever someone visits the website and requests the homepage, for example, the request is passed to the database to retrieve the homepage information. What caching does is create a temporary file (I say temporary because you can specify the expiration) so that when your request comes, it will check for the files it generates instead of processing the request to the database.
This way we can serve faster pages/content to our end users and reduce the database consumption.
If you yet don’t have a caching system implemented, make sure you do from now on as it speeds up your website dramatically.,
CDN: Content Delivery Network
In a few words, it is the network of servers or services in which your content will be hosted, and this network will be used to transfer the content to all the visitors. Using a CDN will help you to spread your content around the world faster than having it hosted on your server.
CPU/Memory Performance
Based on the CPU and Memory Metrics, our stack will be able to scale up or scale in as desired. This way our response time will always be the same between all the servers and what matters is that our traffic doesn’t get to any instance having an overload due to CPU or memory (these are the annoying 500’s errors).
Instance Types
On AWS we have different instance types that we can use depending on the workload we have. We always recommend to choose the right instance type.

If you do not yet know which to use, read this blog.
Definitely, using the correct instance type for our WordPress and selecting the number of resources it needs to run will help.
And there you haveit —you now know how your site could support millions of pageviews with a distributed system.
Additional Considerations
Backup and Disaster Recovery
It is essential to have a backup strategy and a disaster recovery solution in case something happens to our WordPress installation or environment. Luckily, AWS offers a lot of redundancy between all its services that’s a plus for AWS!
There are different ways in which we can protect our application and user’s data:
- WordPress Plugins to Backup the Site (S3).
- Disaster Recovery for Infrastructure (Physical).
- Backup for Users Data (DB — RDS).
- Backup for Application Code.
Amazon Web Services already provides different backup solutions for all its services, so thanks again, Amazon. We will be able to create backups for the RDS with one click and perform the configurations for backups with EC2.
Pro Tips for Optimizing Performance
- To increase the performance, use a Database, query, and page caching plugin.
- Increase the RDS performance with a dedicated Aurora RDS.
- Use S3 and CloudFront to deliver the content faster.
- Enable Alarms on AWS Cloudwatch.
- Enable the Billing Alarm to avoid unwanted usage charges.
- Use Reserved Instances! If you are going to stay in AWS for a long time reserve, it will save you up to 30%.
- Use a version control system to track and deploy your changes to the instances.
Conclusion
In this article, I described what I consider an ideal architecture for a high performance / high traffic WordPress site. As you can see, Amazon provides us with all the tools and technologies to do it, but sometimes it results to be challenging.
If you would like to get more techie blogs, subscribe to our Newsletter.

